
Ya’ll. I am all about efficiency; using a video to teach classroom procedures is the DEFINITION of efficiency at the beginning of a busy school year! I teach middle school band, but ALL educators who want to enjoy their sanity go through the process of teaching beginning of the year classroom procedures when the kids come back. This easy process can be transferred to ANY grade level and ANY subject. Keep reading to learn how I make my QUICK Beginning of the Year Procedures video each August.
The Why – what’s the point?
I show my procedures video the first day/week of school as I see students for the first time. It’s important to me that my students know how I expect them to behave in my class and it makes them feel more comfortable because they know what they are expected to do! Humans feel good when they know what’s going on and how they fit into that process…even weirdo middle school humans 🙂
I use a video to present this information because it is important. When presenting this important info, I want to be able to do it with zero distractions for myself so that I don’t forget something. ALL of my students should receive ALL the same information. I know that if I am speaking this over and over all day, there will be some variation and it’s important to me that they all get the SAME info! Finally, let’s be honest: procedures are not the most exciting content in the world. I am much more energized and ready to welcome kids to my class all day when I don’t have to worry about the draining act of teaching procedures over and over again.
What to do with it?
After I show it in class, we do a Kahoot quiz for fun and throughout the first couple of weeks, I review with some quick questions during class each day. “Who can raise their hand and tell me where to turn in money in the band hall?”, “Silently point to the door we exit through for a fire drill”, “Without talking, hold up one of the things you should have with you in band each day”, etc.
THEN, I put the video on our band website front page – it will live there pretty much all year. I also share it with parents so that they know what is expected of their child (some will watch and some won’t!). With it being easily accessible on our website, I can refer new students to it that move in throughout the year, send it to student teachers or others that may need to know that information, AND can have a student who seems to have “forgotten” our procedures take a break with a band hall iPad and go watch it again to review 😉
Step 1 – list your procedures
First, I make a list of things that I want to include in this presentation. This does not have to be EVERY procedure of the year – just the big ones that they need to know now. You can always add procedures later in the year, especially smaller ones. Here’s my current (in progress) list of what I plan to include in this year’s video:
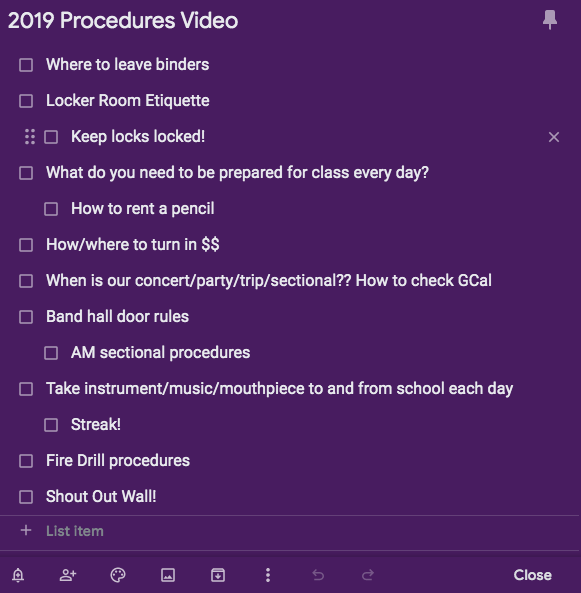
Hint: look through your notes/plans from previous school years (if you were teaching) and make sure to add in information that will help navigate around confusion for your students. (Did you have a problem with students forgetting their supplies in the past? – Make clear from day one what you expect them to have with them each class period)
Step 2 – take some relevant photos/videos
Here’s a fun part! You can do this HOWEVER YOU WANT, but what I usually do is just take my iPad or phone around my room with me taking photos that support the procedures on my list. For Fire Drill procedures, I do a video literally of me exiting the room and going to our line up spot outside. Don’t worry about sound in these videos because you can always take it out later.
Personal note: I do not add other emergency drill procedures into this video if I am planning to publish it online (which I normally do). While this isn’t a rule, I take my job of keeping my students safe very seriously and don’t want to make public any of our other safety drills. Use your best judgement on this one.
Step 3 – compile your visuals
Remember the purpose of this presentation: make a QUICK video that teaches beginning of the year procedures. Don’t stress out about using something totally new and foreign to you to make this presentation! If you’re feeling brave, try something new/newish, but otherwise, stick to what you know…and it will be great! I am here to tell you that a SLIDESHOW will work perfectly for this if that is what you are most comfortable using. Don’t martyr yourself – this is supposed to be helpful to you 🙂
If you decide to use a Movie Editing kind of software, you’ll just need to drag and drop your photos and videos in. When you drag in a video, make sure to either mute the sound or delete the sound (unless you want the original video’s sound).
I usually use iMovie for projects like this. Explain Everything, or another interactive whiteboard kind of app would also work great! If you are looking for a FREE online option, try Adobe Spark Video – a great little video editor!
If you decide on a slideshow, you could use good old Power Point, Keynote, or, my first choice, Google Slides. With Google Slides being WEB BASED already, sharing will be super easy – you can even “publish” it on the web and it will even do automatic slide transitions. Also, YES you can add video to any of these choices and simply “mute” the audio as needed.
Step 4 – add text and audio as desired
Add appropriate text to explain the procedure you are showing with each photo and video. Keep it short and concise so that kids can read it without trouble. If you teach younger students or ELL students, you might consider doing a voice over so that reading is not a barrier for anyone.
Background music is WAY OPTIONAL, but it does add some interest for the kids. I always recommend using something that you have created OR that you have absolute permission to use especially if you are publishing on YouTube. I usually make some loop beats in GarageBand to use as background music. Most Movie Editing programs also have “canned” theme music you can use.
Important Hint: Don’t let your video/slideshow drag on for too long or your students will lose interest.
Step 5 – you rock and are SO on top of things!
Before you relax on the back porch for one last dose of summertime, make sure your presentation is student ready for the first day. Upload it to YouTube and check the link, make sure any slideshows are saved in the appropriate place, double check your connection if you are going to show it directly from a device to the projector, and make certain that you know how to connect your computer to your projector and hook up audio.
NOW you can bask in the enjoyment of being on top of your game and having one less thing on your plate!
My Procedures Video from Last Year
Related Posts
 Be Your Own Co-Teacher!
This is one of my first “virtual co-teacher” videos that I usually show during class time at the beginning of the year to beginners. Obviously the options are endless in this […]
Be Your Own Co-Teacher!
This is one of my first “virtual co-teacher” videos that I usually show during class time at the beginning of the year to beginners. Obviously the options are endless in this […]- 6 Reasons All Music Educators Need Google in Their Life
Google knows more about us than I care to fully fathom and, if you are not familiar with all of the products that Google is producing, it is pretty much taking over the entire internet […]
- Must Have Google Chrome Apps/Extensions for MusicED
Hey peeps - here's my running list of favorite and "must have" Chrome Apps and Extensions! Don't see your favorite listed? Add it in the comments section!
First, if you are new to […]
- How to use Self-Grading Quizzes on Google Forms!
Google Forms has had an overhaul and I just know that you are going to love it! Guess why?! It will now SELF GRADE your quizzes!
This is great news! Along with the quiz and grading […]
- Help! My district blocks YouTube: Four Solutions
Let's be honest, while YouTube can be used in an extremely responsible way for very good educational reasons, there is a lot of useless and inapropriate content housed there as […]
- YouTube Week: Creating A Playlist
Now that you have your YouTube account all situated, it's time to start exploring!
Hopefully you figured out how to subscribe to someone's channel - if not, try it now:
1) Go […]


